Objective: create a hugo website that hides drafts well and that still supports contributions via github issues.
Disclaimer: Since the creation of this post I’ve moved to a cms to handle posting blogposts (just to aid writing with the smartphone). But the main principle of private repo that pushes changes to the public facing one to better support gihub contribution is still active and I still suggest you to implement it.
0. Architecture overview
The basic structure of this is having the following components:
- Private repository: place where you actually edit code and write your posts.
- Public repository: the outward facing repository, the one that Cloudflare pages uses to build the site.
- Github action script: to mirror the essential code/folders from the private repo to the public one, triggered each main branch push.
- Cloudflare pages: setup to host the code on a custom domain
1. Repository setup
Create both your private and public repositories. I called mine blog-dev and blog respectively.
In this chart you can see how all the components interact.
Folder structure
For drafts I created a drafts folder inside content/posts, and you’ll later see that I’m excluding every drafts folder to avoid sharing them in the public facing repo.
Branches
My suggestion is to create a dev branch in the private folder to make changes on the actual site code easier and completely separate from writing posts. On the other hand you can write posts and push them to the main branch easily.
2. Theme handling
I’m going to suppose you’ve already setup you hugo website somewhere else and you’re able to add it to the private repo. If you have a custom theme loaded the recomended way (submodule) you can follow the next part to disable it and revert to a statically pulled theme.
In our case I think it’s the best choice as it bounds you to a version of the theme and avoids changes and also simplifies the Cloudflare pages setup as it doesn’t respond well to submodules. I’ll include an option to update your theme if you still want to.
Remove submodules (Optional)
If you’ve already added your theme as a submodule and want to switch to a static approach, you’ll need to remove it first. Don’t worry, this won’t delete your theme files, just the submodule link.
Run these commands in your project root:
git submodule deinit -f themes/PaperMod
rm -rf .git/modules/themes/PaperMod
git rm -f themes/PaperMod
Replace PaperMod with your actual theme name. After this, the theme folder will be gone and you can re-add it as a static folder in the next step.
Pull theme
Pull any theme you’d like, in my example i used PaperMod. Again, do not use the submodule install method, either pull it or download the zip directly
Remove git from theme
You should now remove the .git folder inside the theme/Yourtheme folder so files can be committed statically.
3. Repository change permission
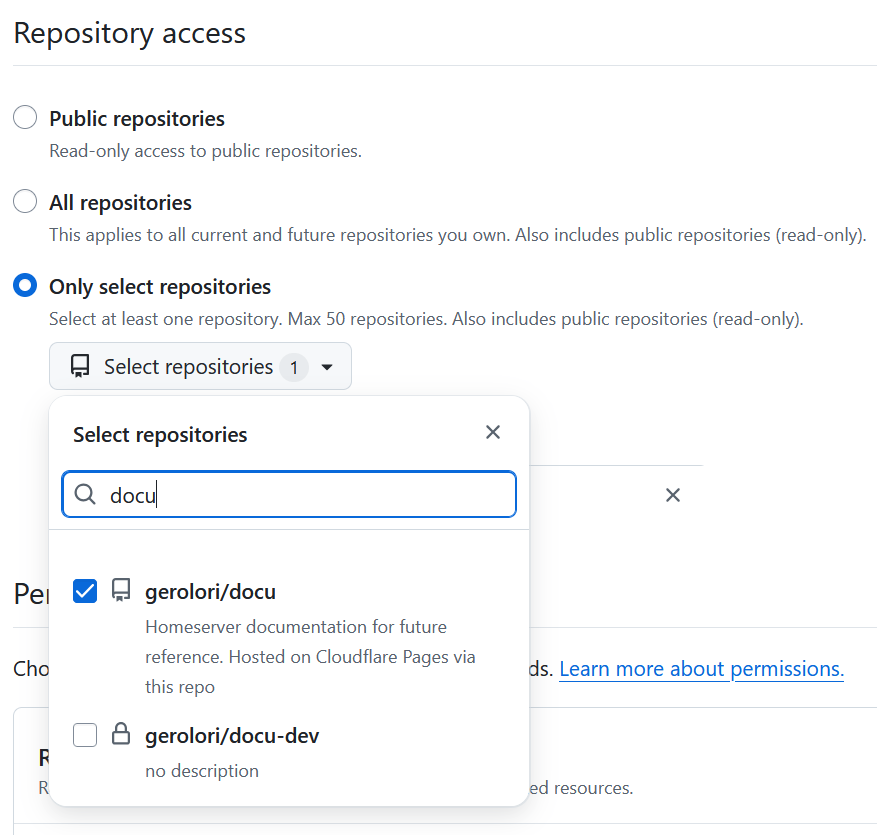
Go to the Fine-grained tokens in your Github settings and generate a new token.
Give it an arbitrary name and set your preferred expiration date (ideally not too long for security). The resource owner should be you in most cases.
Set the Repository access to only selected repos and select your public repo, like so:
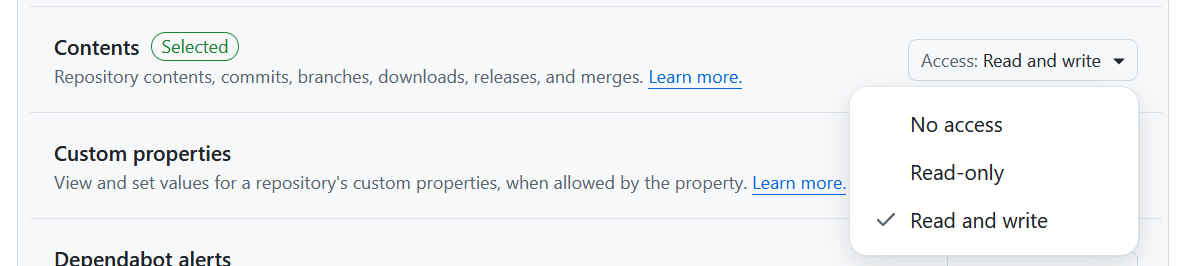
Under repository permission set Content to read and write
After that go into the private repo and select the “Action” tab. Here create a new empty workflow (“set up a workflow for yourself”).
Paste the following script and customize your repo link.
name: Mirror filtered Hugo content to public repo

on:
  push:
    branches:
      - main

jobs:
  mirror:
    runs-on: ubuntu-latest

    steps:
      - name: Checkout private repo (source)
        uses: actions/checkout@v4
        with:
          fetch-depth: 0
          submodules: recursive      # <‑‑ downloads themes/PaperMod too

      - name: Filter sources, keep PaperMod but strip its .git
        run: |
          mkdir public-mirror
          rsync -av \
            --exclude='**/drafts/' \
            --exclude='**/docs/' \
            --exclude='public/' \
            --exclude='.git/' \
            --exclude='/.github/' \
            --exclude='/.gitmodules' \
            ./ public-mirror/

      - name: Push to public repo
        env:
          GH_PAT_MIRROR: ${{ secrets.GH_PAT_MIRROR }}
        run: |
          cd public-mirror
          git init
          git config user.name "GitHub Action"
          git config user.email "[email protected]"
          git remote add origin https://x-access-token:${GH_PAT_MIRROR}@github.com/yourusername/yourrepo.git
          git checkout -b main || git checkout main
          git add .
          git diff --cached --quiet && echo "No changes to commit" || git commit -m "Auto-publish from private repo (filtered, PaperMod included)"
          git push --force origin main
Commit this file and pull your local repo to. So now this script will run every time the main branch recieves a commit.
If you want you can test this by pushing any change of your website to the main branch of the private repo and in a couple of seconds you should see the changes in the public one.
4. Cloudflare Pages setup
Connect public repo
Now head over to the Cloudflare Dashboard and navigate to Pages. Click “Create a project” and select “Connect to Git”.
Choose your public repository from the list. If it’s your first time, you’ll need to authorize Cloudflare to access your GitHub account.
Set up your build settings:
- Build command:
hugo(orhugo --minify --gcif you want minified output and trigger garbage collection) - Build output directory:
public
You might also want to add an environment variable for the Hugo version. Go to Settings → Environment variables and add:
HUGO_VERSION=0.147.0(or whatever version you’re using locally)
Click “Save and Deploy” and Cloudflare will start building your site. The first build takes a minute or two, and you can watch the logs to see if everything goes smoothly.
If the build fails, check the logs for missing dependencies or config issues. The most common problem is a mismatched Hugo version, so make sure the environment variable matches what you have locally.
Link custom domain
Once your site is building correctly, you can link your custom domain. In your Cloudflare Pages project, go to “Custom domains” in the sidebar.
Click “Set up a custom domain” and enter your domain name (like gerosalorenzo.com). Cloudflare will check if the domain is already on Cloudflare.
If your domain is already using Cloudflare’s DNS, everything configures automatically. Just click confirm and you’re done. DNS propagation is nearly instant since it’s all within Cloudflare’s network.
If your domain is registered elsewhere, you’ll need to add a CNAME record pointing to your Pages URL. Cloudflare will show you exactly what record to add. DNS propagation can take anywhere from a few minutes to a few hours in this case.
You can also set up a subdomain (like blog.example.com) the same way. Just enter the full subdomain and Cloudflare handles the rest.
Check out the Cloudflare Pages documentation for more details on custom domain configuration.
Extras
Correct the “suggest changes” button
Should match the public one, I’m using this:
editPost:
    URL: "https://github.com/gerolori/docu/tree/main/content"
    Text: "Suggest Changes" # edit text
    appendFilePath: true # to append file path to Edit link
in my deafult post archetype. Now when clicking th Suggest Changes button it should open the exact file in the public facing repo.